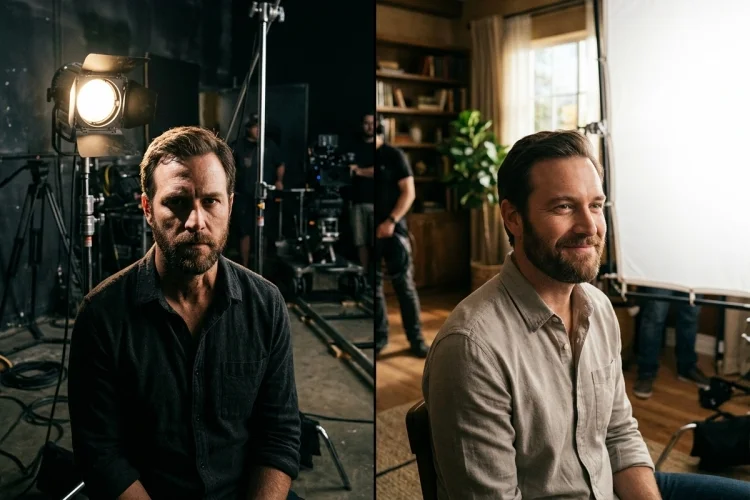
Place an actor beside a small uncovered lamp, and you may see a sharp shadow cutting across their face. Move that lamp behind a large sheet of diffusion, and the same face can suddenly look smoother, gentler, and more open.
This change demonstrates one of the most important lighting principles in filmmaking: the difference between hard light and soft light. Both can illuminate a subject, but they create very different shadows, textures, moods, and visual relationships.
Hard light produces clearly defined shadows and strong transitions between bright and dark areas. Soft light creates broader, less noticeable shadow edges that appear to wrap around the subject.
Neither option is automatically better or more cinematic. The right choice depends on the story, character, setting, and emotion of the scene.
Understanding hard light vs soft light gives filmmakers greater control over visual storytelling. It also helps beginners shape professional-looking images with simple tools, including sunlight, windows, lamps, reflectors, diffusion fabric, and white walls.
What Is Hard Light?
Hard light comes from a source that appears small relative to the subject. It creates a narrow, well-defined transition between illuminated and shadowed areas.
Direct midday sunlight is a classic example. Although the sun is physically enormous, it is so far away that it appears relatively small in the sky. As a result, it can produce crisp shadows beneath a person’s nose, chin, and eyebrows.
Bare bulbs, spotlights, flashlights, and small LEDs can also behave as hard sources. The American Society of Cinematographers explains that smaller or more distant sources generally create sharper shadow edges, strong direction, and greater visibility of surface texture.
Hard illumination can reveal wrinkles, rough walls, dust, fabric, and facial structure. It often feels bold, dramatic, energetic, or uncomfortable, depending on its direction and the surrounding contrast.
What Is Soft Light?
Soft light comes from a source that appears large in relation to the subject. Instead of creating an abrupt shadow edge, it produces a gradual transition from light to darkness.
An overcast sky is one of the largest natural soft sources. Clouds spread sunlight across a wide area, reducing sharp shadows and creating more even illumination.
The ASC describes a heavily overcast sky as an extremely soft source capable of producing long, nearly invisible transitions between light and shadow.
Large windows, softboxes, bounced lights, and diffusion frames can produce similar results. Soft illumination tends to wrap around faces and objects, reducing the appearance of fine texture and making changes in brightness feel smoother.
For this reason, it is widely used for interviews, beauty work, intimate drama, romance, and naturalistic scenes. However, soft light can still create tension when it is placed carefully or combined with deep surrounding shadows.
The Main Difference Is the Shadow Edge
The easiest way to identify hard light or soft light is to look at the shadows. Do not judge only by how bright the source appears.
Hard light creates a sharp boundary between illuminated and dark areas. You can usually see the exact shape of a nose, hand, window frame, or object in the resulting shadow.
Soft light produces a wider transition zone, often called the penumbra. The shadow gradually becomes darker rather than beginning with a clear line. An extremely large source may create shadows that are barely noticeable.
Hardness Is Not the Same as Brightness
A common beginner mistake is assuming that bright light is hard and dim light is soft. Brightness describes the quantity of illumination, while hardness describes the quality of the shadow transition.
A powerful lamp can produce soft light when bounced onto a large white wall. A weak flashlight can still produce hard shadows because its emitting surface is small.
This distinction matters on set. Dimming a hard source usually makes it darker, but it does not necessarily make it softer. To change its quality, you generally need to change its apparent size, distance, or method of delivery.
Source Size and Distance Control Light Quality
The apparent size of a source is more important than its physical size alone. A source becomes relatively larger when it moves closer to the subject and relatively smaller when it moves farther away.
Imagine holding a small LED panel one metre from an actor. Moving it much closer can soften its shadows because the panel now occupies a larger part of the actor’s field of view.
The opposite is also true. Moving a softbox far away can make it behave more like a smaller source, producing more defined shadows. The ASC identifies the size of the source relative to its distance from the subject as the main factor controlling hard and soft light.
Distance also affects intensity and fall-off. Bringing a lamp closer may make it both softer and much brighter, so exposure and background brightness may need to be adjusted.
Research and testing published by the ASC also show that broad sources can behave differently from ideal point sources when light fall-off is measured.
How Hard Light Affects a Film Scene
Hard illumination creates visible structure. It can carve facial features, project graphic shadows, separate areas of a set, and direct attention with considerable precision.
This makes it useful for film noir, thrillers, horror, historical glamour, harsh daylight scenes, and moments of confrontation. A hard beam entering through blinds can divide a room into striking bands of brightness and darkness.
Because the source is directional, filmmakers can often control where it falls with barn doors, flags, cutters, or other modifiers. This makes it effective when only one area of the frame should be illuminated.
Hard light can also give a film a deliberately stylised appearance. The cinematography of The Love Witch, for example, used a harder, classic key-light approach inspired by mid-century colour films, helping emphasise the production’s costumes, colours, and glamorous visual design.
The disadvantage is that hard illumination can emphasise unwanted texture and produce distracting shadows. Small changes in actor position may also move a sharp facial shadow noticeably.
How Soft Light Changes Faces and Environments
Soft light tends to create smoother facial transitions and less visible texture. It can feel flattering because shadows around the eyes, nose, and skin are less sharply defined.
Its broad coverage also allows actors more freedom to move. When a large source covers an entire performance area, the actor may not need to remain on one exact lighting mark.
Soft illumination is often associated with naturalism because it can resemble window light, an overcast sky, or reflected environmental light. It is especially useful when a scene should feel emotionally open, calm, romantic, or observational.
However, soft does not mean flat. A large source placed on one side of a face can still create direction and dramatic contrast. The unlit side can remain dark, especially when filmmakers use negative fill to remove unwanted reflected light.
Modern fixtures can also be configured for different qualities. ARRI’s lighting guidance shows how one system can produce native soft illumination, focused hard light, or light intended for bouncing through larger diffusion surfaces.
Soft Light Is Not the Same as High-Key Lighting
Hard versus soft describes shadow quality. High-key versus low-key describes the broader balance of brightness and contrast across a scene.
High-key lighting generally has brighter overall exposure, relatively low contrast, and fewer deep shadows. It often uses large sources, generous fill, and light-coloured sets.
Low-key lighting contains stronger differences between bright and dark areas. It may leave large sections of the frame in shadow and is frequently used for mystery, suspense, and dramatic tension.
You can therefore create low-key cinematography with a soft source. Place a large diffused lamp on one side of an actor and allow the other side of the face and background to remain dark.
You can also build a bright scene with harder sources, although the resulting shadows will be more visible. Treat these terms as separate creative controls rather than interchangeable labels.
How to Turn Hard Light Into Soft Light
One common method is diffusion. Place translucent material between the lamp and subject so the illuminated surface becomes the new, broader source.
The diffusion must be large enough and positioned effectively. Simply attaching a tiny layer of material directly to a small lamp may reduce its intensity without increasing its apparent size very much.
Another option is bounce lighting. Aim the lamp at a white wall, ceiling, reflector, foam board, or fabric. The larger reflected surface then illuminates the subject with softer shadows.
Filmmakers can also combine both methods by bouncing a hard fixture and then passing the reflected light through diffusion. Professional lighting systems are often designed to work directly, through frames, or as bounce sources depending on the required quality.
Always use heat-resistant materials designed or safely positioned for the fixture. Household fabrics should never touch hot lamps.
When Should You Use Hard or Soft Light?
Choose light quality according to what the scene needs to communicate. Hard illumination may suit a character under pressure, an unforgiving environment, or a stylised visual world.
Soft illumination may support vulnerability, beauty, comfort, naturalism, or emotional closeness. It can also provide practical coverage for scenes involving significant actor movement.
Many effective scenes use both. A soft key light may illuminate an actor’s face while a harder source creates sunlight on the background. A hard backlight can separate a subject while the front of the face remains gently lit.
The choice may even change during the story. A film could begin with soft, open lighting and gradually introduce harder shadows as the protagonist loses control.
Avoid selecting a setup only because it looks attractive in isolation. Ask what the light says about the character, location, and emotional moment.
A Simple Lighting Exercise for Beginners
Place a person near a plain wall and illuminate them with a small bare lamp from the side. Observe the defined facial shadow and the sharp silhouette projected onto the wall.
Next, bounce the same lamp off a large white surface or shine it through a broad diffusion frame. Keep the actor and camera in the same positions, then record another shot.
Compare the shadow edge, skin texture, background, contrast, and overall mood. Move the softened source closer and farther away to see how its apparent size changes.
This exercise demonstrates that lighting quality depends less on owning expensive equipment and more on controlling size, placement, distance, and direction.
The difference between hard light and soft light is mainly visible in the transition between brightness and shadow. Hard sources produce crisp edges, strong direction, and visible texture, while soft sources create broader transitions, smoother faces, and a more wrapping effect.
Neither approach is inherently superior. Hard illumination can add tension, energy, and graphic style. Soft illumination can create intimacy, naturalism, and flexibility, but it can also remain dramatic when contrast is carefully controlled.
Choose a simple scene and film it once with a small direct source and once with a large bounced or diffused source. Comparing the two versions will help you see how light quality changes not only the image, but also the story the image tells.